Introduction
Today we will be making a poster from the movie Despicable Me. Im sure most of you have already seen Despicable Me, and most likely fell in love with the adorable minions. This tutorial is aimed mostly at novice users, since its really simple to do, but the final result is very pleasing.
Note: If You Are Just Starting Out With Adobe Photoshop, And Have A Hard Time Following The Basics Presented In This Tutorial. Consider Going Through Our Adobe Photoshop Essentials Series, Before You Dive In To More Advanced Material.
Preview

Step 1
We start off by creating a New Document, with size 600 pixels by 800 pixels at 72 dpi.
Step 2
Now select the Ellipse Tool (U), so you can create a circular shape, in order to create a perfect circle do not forget to hold Shift. The circular shape you will be making, will represent the eye goggle, so size it accordingly.
Once you create the circle shape, again with the Ellipse Tool but on a new layer, create a second circular shape inside the previous one but a bit smaller. We will use this second shape, in order to make a cut out inside the first larger shape.
Step 3
Start of by centering the smaller circle shape inside the larger circle shape. Now with the Ellipse Tool selected, select the larger circle from layers palette, and from the shape toolbar chose Exclude Overlapping Shapes and repeat the process for the smaller shape.
Now copy the smaller shape first, then select the larger shape, and finally paste the smaller shape on the larger shape. Once again select “Exclude Overlapping Shapes“. Your final result should look like the image below, feel free to name this layer to Goggle.

Step 4
Now paint the background layer a yellowish color, I used #e7cd45.
Step 5
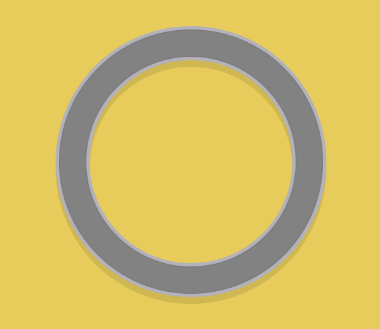
Double click on the goggle shape, in order to change the color to #828282.
Step 6
On the goggle layer open the blending options and make the following changes:
- Stroke: Size 5, Position Outside, Color #b3b2bd.
- Inner Shadow: Opacity 20%, Distance 0px, Choke 0%, Size 3px.
- Drop Shadow: Opacity 10%, Angle 90, Deselect Use Global Light, Distance 10px, Spread 100%, Size 5px.
Once done, your Goggle layer should now look like the image below.
Step 7
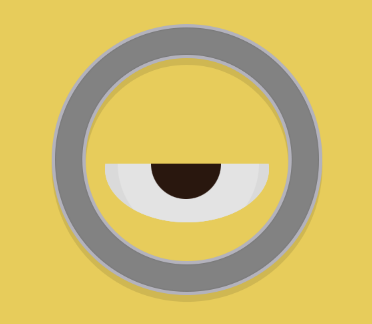
In order to create the eye, the steps are similar as for the goggle. First create one shape with the Ellipse Tool, than from the layer palette, right click on the shape and rasterize the layer. Once the layer is rasterized, with the marquee tool select the unwanted part, and hit delete. Repeat the process for the three different parts of the eye. The colors I have used are #29170dfor the iris, #e3e3e3 for the white part, and #dadada on the outside of the white part, and the final result is this.
Step 8
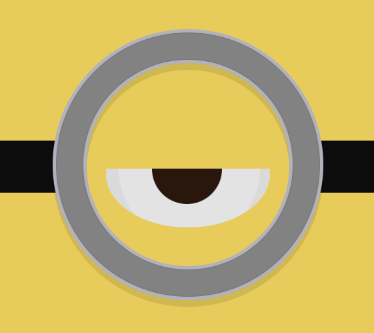
With your preferred method, draw the strap that is holding the goggle. If you do not have a preferred method how to do this, you could simply make a selection with the marquee tool on a new layer, fill the selection with #0c0c0c and then delete the unwanted part.
Step 9
Now select the Pen Tool and create a new layer, click once where you want the mouth to start, and click again and hold (Do Not Release) where you want the mouth to end. If you still hold the left click, now you can drag the mouse a bit in order to make a curve. Now select the brush tool, chose a black color, and a hard brush. Hard brushes are the ones that are more solid.
Now select the pen tool again, right click on the path, and click Stroke. Chose from the menu “Brush“, and make sure that simulate pressure is ticked. Now delete the path, and what you end up with, is a nice smirk on your minion.
Final Product
Conclusion
Even though the effects used in making this poster are nothing special, the final result is highly pleasing. You can replicate the process we used here, in order to create various minimalistic posters that look stunning, only your imagination would be a limit here. I hope you enjoyed this tutorial, and let me remind you, that you can also download the source file below.
Similar Posts


Today we will be making a poster from the movie Despicable Me. Im sure most of you have already seen Despicable Me, and most likely fell in love with the adorable minions. This tutorial is aimed mostly at novice users, since its really simple to do, but the final result is very pleasing.
Note: If you are just starting out with Adobe Photoshop, and have a hard time following the basics presented in this tutorial. Consider going through our Adobe Photoshop Essentials series, before you dive in to more advanced material.
Step 1
We start off by creating a New Document, with size 600 pixels by 800 pixels at 72 dpi.
Step 2
Now select the Ellipse Tool (U), so you can create a circular shape, in order to create a perfect circle do not forget to hold shift. The circular shape you will be making, will represent the eye goggle, so size it accordingly.
Once you create the circle shape, again with the Ellipse Tool but on a new layer, create a second circular shape inside the previous one but a bit smaller. We will use this second shape, in order to make a cut out inside the first larger shape.
Step 3
Start of by centering the smaller circle shape inside the larger circle shape. Now with the Ellipse Tool selected, select the larger circle from layers palette, and from the shape toolbar chose exclude overlapping shapes and repeat the process for the smaller shape.
Now copy the smaller shape first, then select the larger shape, and finally paste the smaller shape on the larger shape. Once again select “exclude overlapping shapes“. Your final result should look like the image below, feel free to name this layer to Goggle.
Step 4
Now paint the background layer a yellowish color, I used #e7cd45.
Step 5
Double click on the goggle shape, in order to change the color to #828282.
Step 6
On the goggle layer open the blending options and make the following changes:
- Stroke: Size 5, Position Outside, Color #b3b2bd.
- Inner Shadow: Opacity 20%, Distance 0px, Choke 0%, Size 3px.
- Drop Shadow: Opacity 10%, Angle 90, Deselect Use Global Light, Distance 10px, Spread 100%, Size 5px.
Once done, your Goggle layer should now look like the image below.
Step 7
In order to create the eye, the steps are similar as for the goggle. First create one shape with the Ellipse Tool, than from the layer palette, right click on the shape and rasterize the layer. Once the layer is rasterized, with the marquee tool select the unwanted part, and hit delete. Repeat the process for the three different parts of the eye. The colors I have used are #29170d for the iris, #e3e3e3 for the white part, and #dadada on the outside of the white part, and the final result is this.
Step 8
With your preferred method, draw the strap that is holding the goggle. If you do not have a preferred method how to do this, you could simply make a selection with the marquee tool on a new layer, fill the selection with #0c0c0c and then delete the unwanted part.
Step 9
Now select the Pen Tool and create a new layer, click once where you want the mouth to start, and click again and hold (do not release) where you want the mouth to end. If you still hold the left click, now you can drag the mouse a bit in order to make a curve. Now select the brush tool, chose a black color, and a hard brush. Hard brushes are the ones that are more solid.
Now select the pen tool again, right click on the path, and click stroke. Chose from the menu “Brush“, and make sure that simulate pressure is ticked. Now delete the path, and what you end up with, is a nice smirk on your minion.
Final Product
Conclusion
Even though the effects used in making this poster are nothing special, the final result is highly pleasing. You can replicate the process we used here, in order to create various minimalistic posters that look stunning, only your imagination would be a limit here. I hope you enjoyed this tutorial, and let me remind you, that you can also download the source file below.