Introduction
In the following tutorial, we are going to make a metallic text effect by using layer style, which you can then apply to different projects. As an inspiration I took the Sony Vaio logo, since I find it to be a perfect for this tutorial. Let me remind you that you can also download the sample PSD file at the bottom of this tutorial, if you do not want to make the tutorial but just want to use the layer style.
Note: If You Are Just Starting Out With Adobe Photoshop, And Have A Hard Time Following The Basics Presented In This Tutorial. Consider Going Through Our Adobe Photoshop Essentials Series, Before You Dive In To More Advanced Material.
Preview

Download Assets
Step 1
First create a new document with size 730 pixels by 419 pixels at 72dpi, and leave the background color as it is for now.
Step 2
Now download and install the following font, then in your document write Vaio with all capital letters and size 120pt.
Step 3
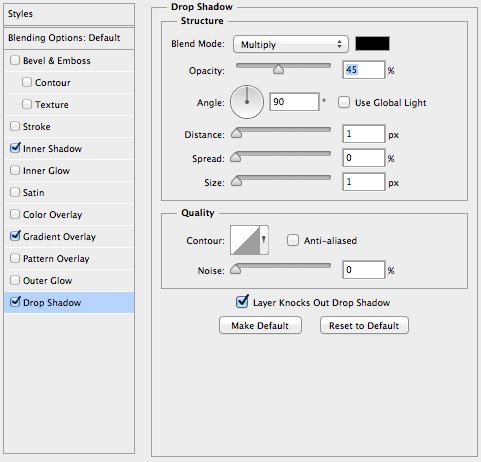
On the text layer from the blending options menu, apply the following styles:
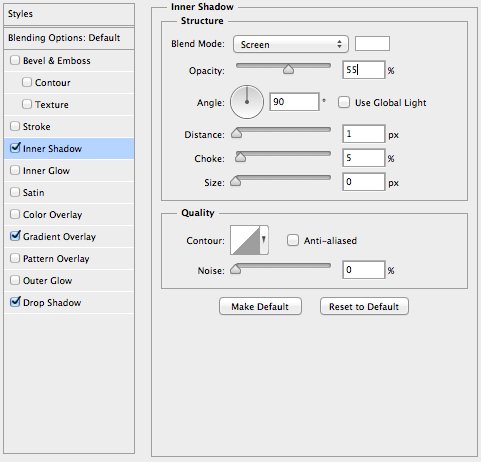

The colors used in the Gradient Overlay style are: #d2d7dd and #9fa5b5.
Step 4
Now we are going to add the greenish shine on the logo, hold ctrl and click on the T icon of the text layer, and a selection around the text should appear. With the selection in place, create a new layer, and fill the selection with #00ffb4. Now chose the Marquee Tool, and nudge the selection three pixels up, by hitting the up arrow on the keyboard three times, after that hit delete.
Step 5
To the greenish shine layer, add Gaussian Blur of 5 px, then once again make selection around the text layer just like in the previous step. But now once you create the selection, go to Selection / Inverse and hit the delete button. This step ensures that there is no excess green color bleeding outside the text and on to the background.
Step 6
Finally change the Blending Mode to Soft Light and the Opacity to 45%.
Step 7
Copy the layer style from the text layer (Right Click On The Text Layer / Copy Layer Style) and past it on the background layer. You might need to unlock the background layer first. Once you have pasted the layer style, hide or delete the inner and drop shadow styles. Now right click on the background layer, and chose Rasterize Layer Styles.
Step 8
Now go to Image / Adjustments / Hue & Saturation and increase the Hue by 10 and the saturation by 5. All you are left to do now is, to add a subtle noise of 0.6%.
Final Product
Conclusion
Your Vaio logo is complete, you can now copy and paste the metallic layer style on different layers and shapes. Keep in mind that you would need to make slight adjustments to the inner and drop shadow styles, in case your background is lighter or darker compared to the example in this tutorial.
Similar Posts


In the following tutorial, we are going to make a metallic text effect by using layer style, which you can then apply to different projects. As an inspiration I took the Sony Vaio logo, since I find it to be a perfect for this tutorial. Let me remind you that you can also download the sample PSD file at the bottom of this tutorial, if you do not want to make the tutorial but just want to use the layer style.
Note: If you are just starting out with Adobe Photoshop, and have a hard time following the basics presented in this tutorial. Consider going through our Adobe Photoshop Essentials series, before you dive in to more advanced material.
Step 1
First create a new document with size 730 pixels by 419 pixels at 72dpi, and leave the background color as it is for now.
Step 2
Now download and install the following font, then in your document write Vaio with all capital letters and size 120pt.
Step 3
On the text layer from the blending options menu, apply the following styles:
The colors used in the Gradient Overlay style are: #d2d7dd and #9fa5b5.
Step 4
Now we are going to add the greenish shine on the logo, hold ctrl and click on the T icon of the text layer, and a selection around the text should appear. With the selection in place, create a new layer, and fill the selection with #00ffb4. Now chose the Marquee Tool, and nudge the selection three pixels up, by hitting the up arrow on the keyboard three times, after that hit delete.
Step 5
To the greenish shine layer, add Gaussian Blur of 5 px, then once again make selection around the text layer just like in the previous step. But now once you create the selection, go to Selection / Inverse and hit the delete button. This step ensures that there is no excess green color bleeding outside the text and on to the background.
Step 6
Finally change the Blending Mode to Soft Light and the Opacity to 45%.
Step 7
Copy the layer style from the text layer (right click on the text layer / copy layer style) and past it on the background layer. You might need to unlock the background layer first. Once you have pasted the layer style, hide or delete the inner and drop shadow styles. Now right click on the background layer, and chose Rasterize Layer Styles.
Step 8
Now go to Image / Adjustments / Hue & Saturation and increase the Hue by 10 and the saturation by 5. All you are left to do now is, to add a subtle noise of 0.6%.
Final Product
Conclusion
Your Vaio logo is complete, you can now copy and paste the metallic layer style on different layers and shapes. Keep in mind that you would need to make slight adjustments to the inner and drop shadow styles, in case your background is lighter or darker compared to the example in this tutorial.
Thanks for the tutorial.